1. Deploy Native Application to Oracle Cloud Platform
1.1. Install Command Line Interface (CLI)
brew update && brew install oci-clibrew update && brew upgrade oci-cbrew uninstall oci-cliFor other OS use: Install Command Line Interface (CLI)
1.2. Config OCI-CLI
oci setup configterminal output
    This command provides a walkthrough of creating a valid CLI config file.

    The following links explain where to find the information required by this
    script:

    User API Signing Key, OCID and Tenancy OCID:

        https://docs.cloud.oracle.com/Content/API/Concepts/apisigningkey.htm#Other

    Region:

        https://docs.cloud.oracle.com/Content/General/Concepts/regions.htm

    General config documentation:

        https://docs.cloud.oracle.com/Content/API/Concepts/sdkconfig.htm


Enter a location for your config [/Users/stuetz/.oci/config]:

...

Config written to /Users/stuetz/.oci/config


    If you haven't already uploaded your API Signing public key through the
    console, follow the instructions on the page linked below in the section
    'How to upload the public key':

        https://docs.cloud.oracle.com/Content/API/Concepts/apisigningkey.htm#How2
oci session authenticateterminal output
Enter a region (e.g. ap-chuncheon-1, ap-hyderabad-1, ap-melbourne-1, ap-mumbai-1, ap-osaka-1, ap-seoul-1, ap-sydney-1, ap-tokyo-1, ca-montreal-1, ca-toronto-1, eu-amsterdam-1, eu-frankfurt-1, eu-zurich-1, me-jeddah-1, sa-saopaulo-1, uk-gov-cardiff-1, uk-gov-london-1, uk-london-1, us-ashburn-1, us-gov-ashburn-1, us-gov-chicago-1, us-gov-phoenix-1, us-langley-1, us-luke-1, us-phoenix-1, us-sanjose-1): eu-frankfurt-1
    Please switch to newly opened browser window to log in!
    Completed browser authentication process!
Enter the name of the profile you would like to create: htl-leonding
Config written to: /Users/stuetz/.oci/config

    Try out your newly created session credentials with the following example command:

    oci iam region list --config-file /Users/stuetz/.oci/config --profile htl-leonding --auth security_token
1.2.1. Authenticate Session
oci session authenticate
Enter a region (e.g. ap-chuncheon-1, ap-hyderabad-1, ap-melbourne-1, ap-mumbai-1, ap-osaka-1, ap-seoul-1, ap-sydney-1, ap-tokyo-1, ca-montreal-1, ca-toronto-1, eu-amsterdam-1, eu-frankfurt-1, eu-zurich-1, me-jeddah-1, sa-saopaulo-1, uk-gov-cardiff-1, uk-gov-london-1, uk-london-1, us-ashburn-1, us-gov-ashburn-1, us-gov-chicago-1, us-gov-phoenix-1, us-langley-1, us-luke-1, us-phoenix-1, us-sanjose-1): eu-frankfurt-1
    Please switch to newly opened browser window to log in!
    Completed browser authentication process!
Enter the name of the profile you would like to create: htl-leonding
Config written to: /Users/stuetz/.oci/config

    Try out your newly created session credentials with the following example command:

    oci iam region list --config-file /Users/stuetz/.oci/config --profile htl-leonding --auth security_token
1.2.2. Session-Login to Oracle Cloud Registry with Token
docker login fra.ocir.ioUsername: <tenancy-namespace>/oracleidentitycloudservice/<username> Password: <insert the created token here> Login Succeeded
| entry | description |
|---|---|
fra |
<region-key> is the key for the Oracle Cloud Infrastructure Registry region you’re using. For example, iad. See Availability by Region. |
<tenancy-namespace> |
When prompted, enter your username in the format <tenancy-namespace>/<username>, where <tenancy-namespace> is the auto-generated Object Storage namespace string of your tenancy (as shown on the Tenancy Information page). For example, ansh81vru1zp/jdoe@acme.com. If your tenancy is federated with Oracle Identity Cloud Service, use the format <tenancy-namespace>/oracleidentitycloudservice/<username>. |
Username |
your email |
Password |
|
1.2.3. Push Image to Oracle Registry
docker imagesREPOSITORY TAG IMAGE ID CREATED SIZE ... stuetz/quarkus-kubernetes 1.0-SNAPSHOT 7d8bcaa8e607 17 hours ago 503MB ...
docker tag stuetz/quarkus-kubernetes:1.0-SNAPSHOT fra.ocir.io/<tenancy-namespace>/htl-leonding-lab/quarkus-kubernetes:version1.0.testdocker imagesREPOSITORY TAG IMAGE ID CREATED SIZE ... stuetz/quarkus-kubernetes 1.0-SNAPSHOT 7d8bcaa8e607 17 hours ago 503MB fra.ocir.io/<tenancy-namespace>/htl-leonding-lab/quarkus-kubernetes version1.0.test 7d8bcaa8e607 17 hours ago 503MB ...
docker push fra.ocir.io/<tenancy-namespace>/htl-leonding-lab/quarkus-kubernetes:version1.0.test1.2.4. Pull Image from Oracle Registry
-
create a named secret containing Oracle Cloud Infrastructure credentials
-
add the named secret to a manifest .yml file, along with the name and location of an image to pull from Oracle Cloud Infrastructure Registry
-
use the manifest .yml file to deploy the helloworld application to a Kubernetes cluster and create an Oracle Cloud Infrastructure load balancer
-
verify that the helloworld application is working as expected, and that the load balancer is distributing requests between the nodes in a cluster
1.2.5. Connect kubectl to OCI Cluster
Check, if API key exists
-
In the top-right corner of the Console, open the Profile menu (User menu icon) and then click User Settings to view the details.
-
Check, if a api key exists.
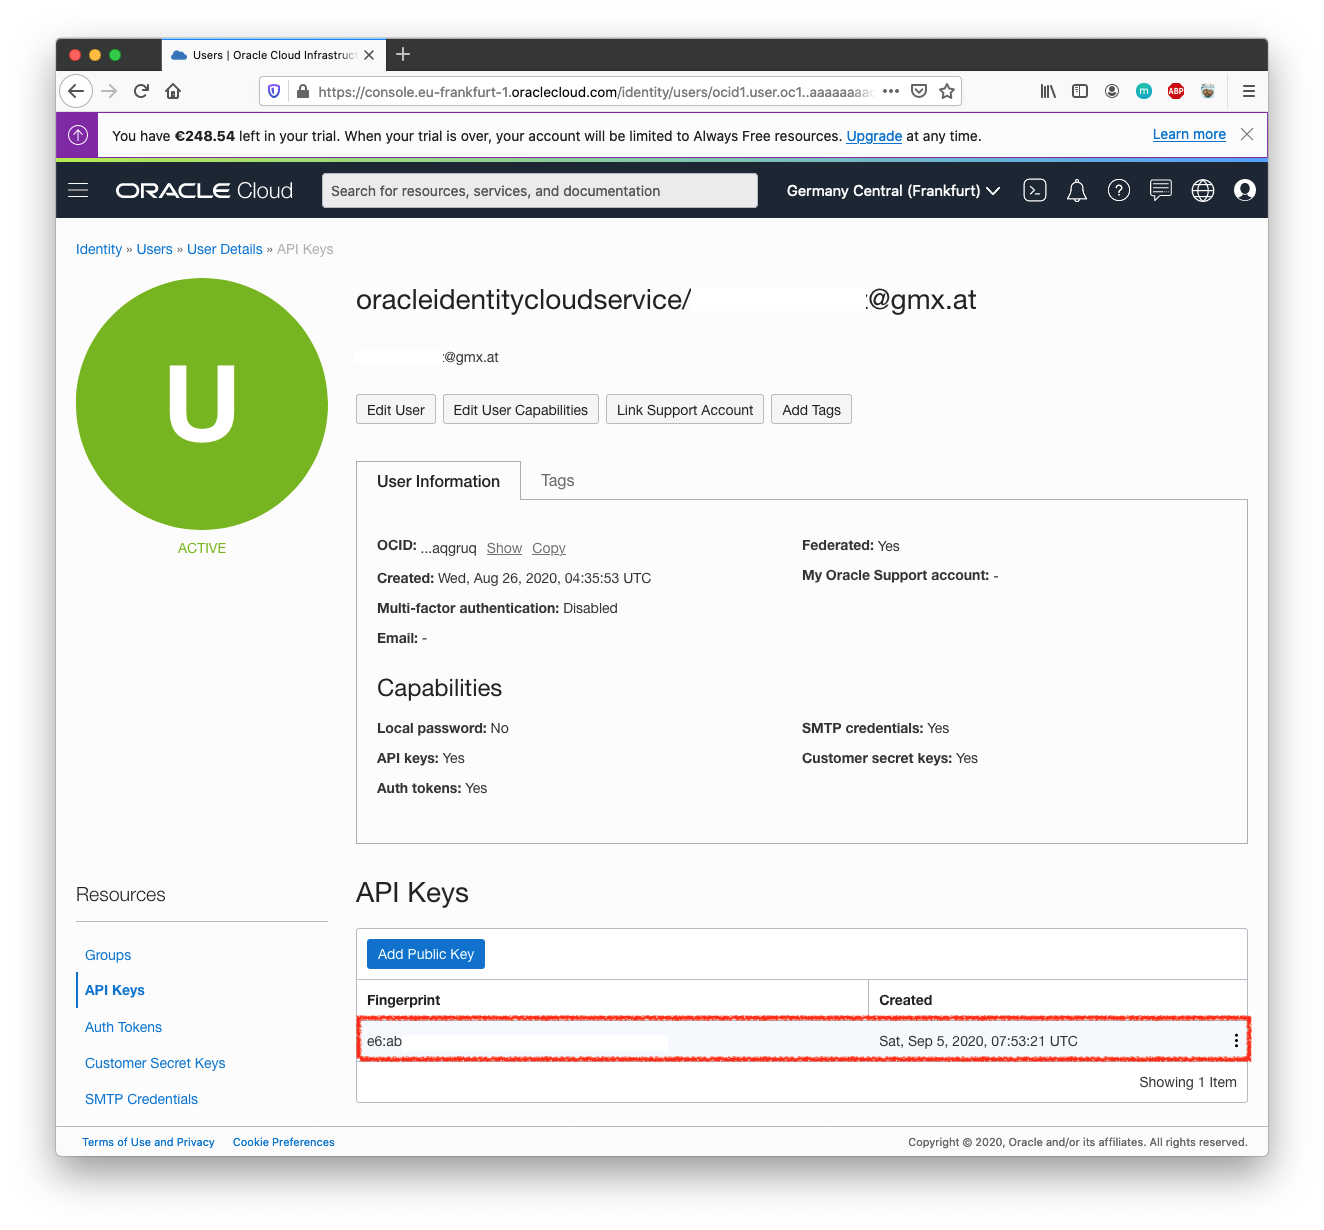
-
If no API Key exists
-
Click Add Public Key.
-
Drag the public-key-file form your <HOME-DIR>/.oci on the upload window.
-
Click Add.
-
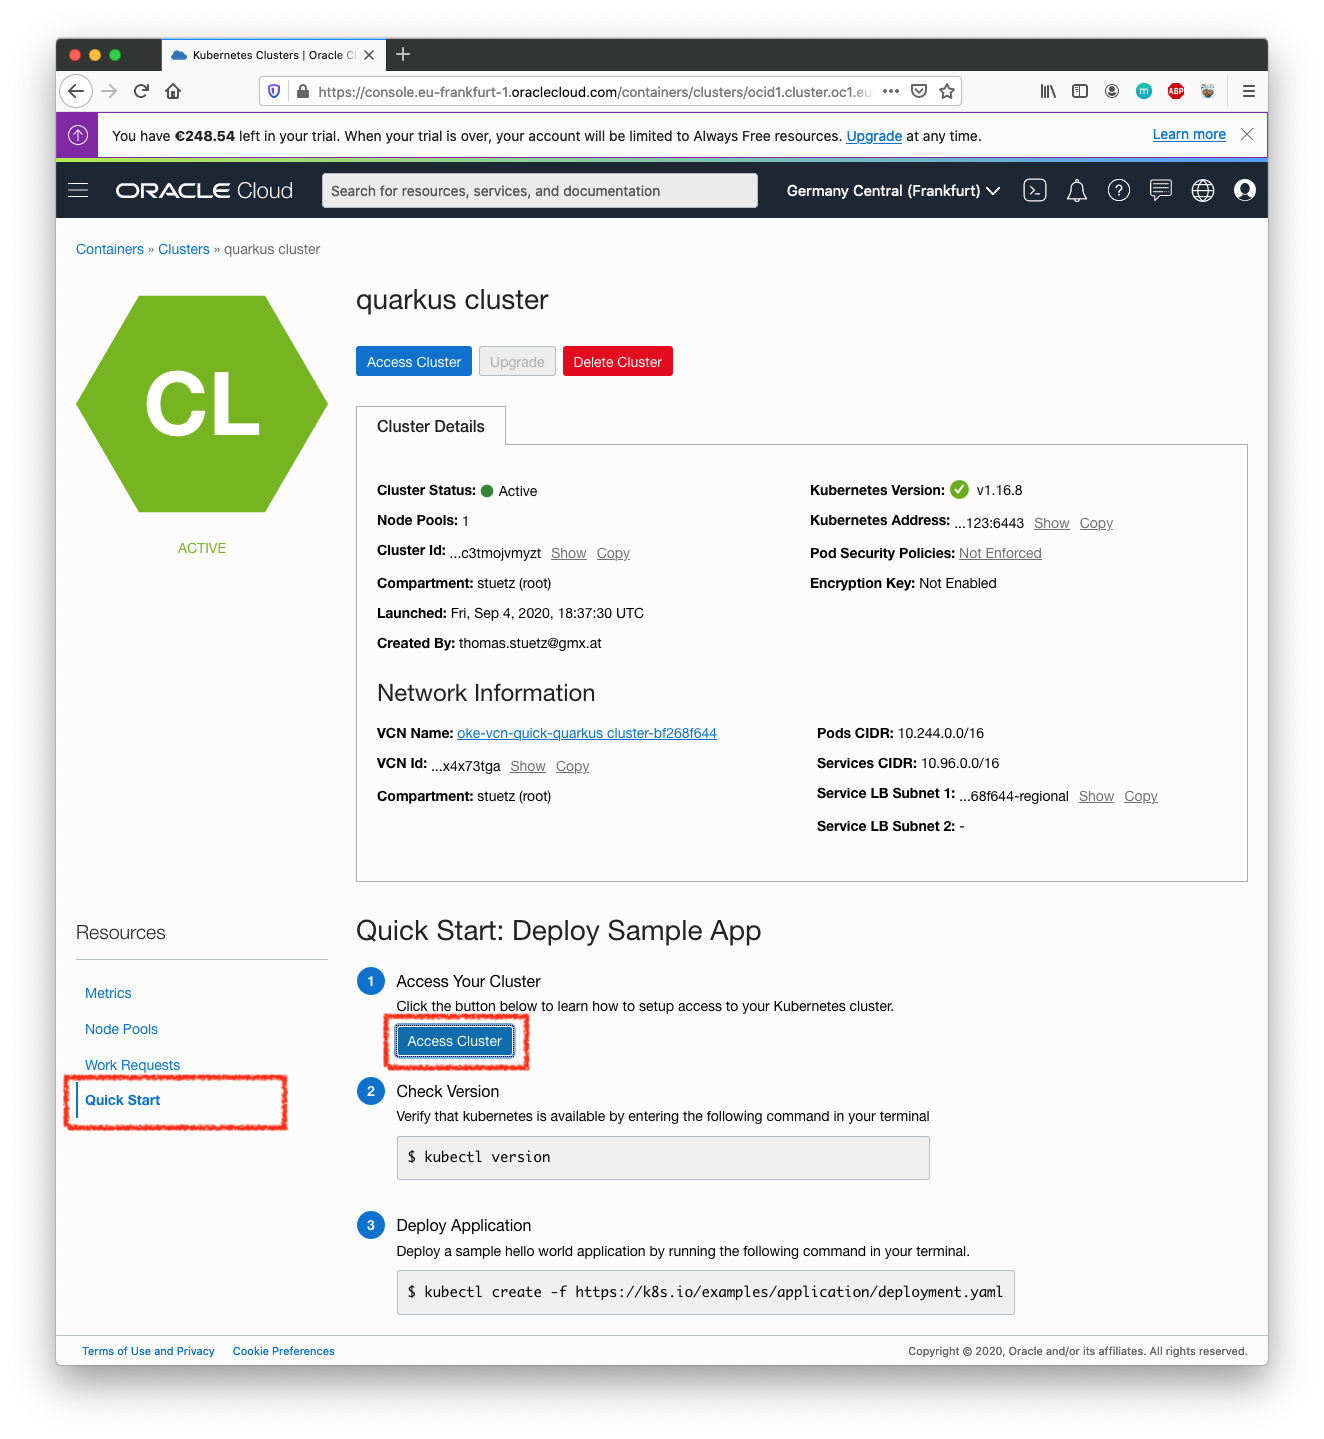
Connect the local OCI shell to the cluster
-
In the Console, open the navigation menu (Hamburger). Under Solutions and Platform, go to Developer Services and click Kubernetes Clusters.
-
Choose a Compartment that you have permission to work in, and in which you want to create both the new cluster and the associated network resources.
→ here stuetz (Root) -
On the Clusters page, click Create Cluster.
-
In the Create Cluster dialog box, click Quick Create and click Launch Workflow.
-
On the Create Cluster page, change the placeholder value in the Name field and enter quarkus cluster instead.
-
Click Next to review the details you entered for the new cluster.
-
On the Review page, click Create Cluster to create the new network resources and the new cluster. You see the different network resources being created for you.
-
Click Close to return to the Console.
The new cluster is shown on the Cluster Details page. When it has been created, the new cluster has a status of Active.
-
Under Resources, select Node Pools and click the name of the node pool in the cluster you just created (pool1). Under Resources, select Quick Start and scroll down to see details of the new worker nodes (compute instances) in the node pool.
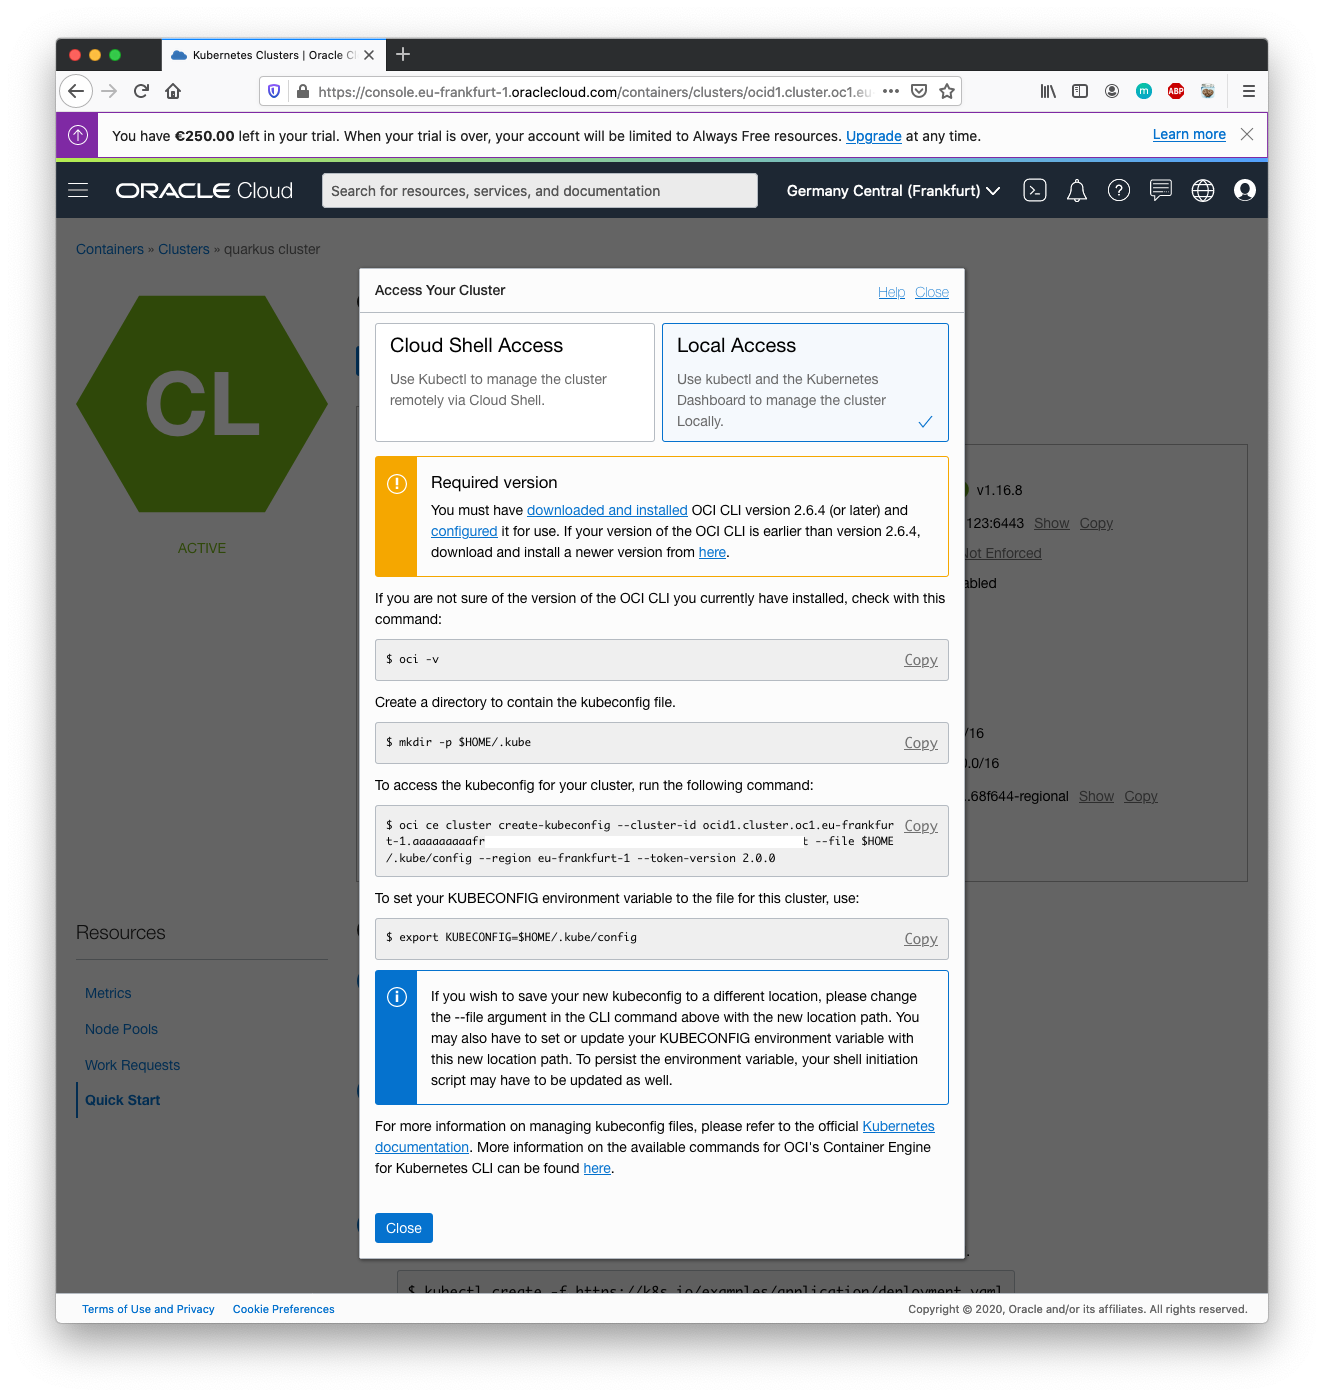
oci -vmkdir -p $HOME/.kubeoci ce cluster create-kubeconfig --cluster-id ocid1.cluster.oc1.eu-frankfurt-1.aaaaaaaaafrtkxxxxxxxxxxxxxxxxyzt --file $HOME/.kube/config --region eu-frankfurt-1 --token-version 2.0.0Existing Kubeconfig file found at /Users/stuetz/.kube/config and new config merged into it
export KUBECONFIG=$HOME/.kube/configecho $KUBECONFIG/Users/stuetz/.kube/config
kubectl versionClient Version: version.Info{Major:"1", Minor:"19", GitVersion:"v1.19.0", GitCommit:"e19964183377d0ec2052d1f1fa930c4d7575bd50", GitTreeState:"clean", BuildDate:"2020-08-26T21:54:15Z", GoVersion:"go1.15", Compiler:"gc", Platform:"darwin/amd64"}
Server Version: version.Info{Major:"1", Minor:"16", GitVersion:"v1.16.8", GitCommit:"fdba62c353cc548995bbe730321f64176e4f6e4b", GitTreeState:"clean", BuildDate:"2020-04-08T18:15:19Z", GoVersion:"go1.13.8 BoringCrypto", Compiler:"gc", Platform:"linux/amd64"}
kubectl create -f https://k8s.io/examples/application/deployment.yamldeployment.apps/nginx-deployment created